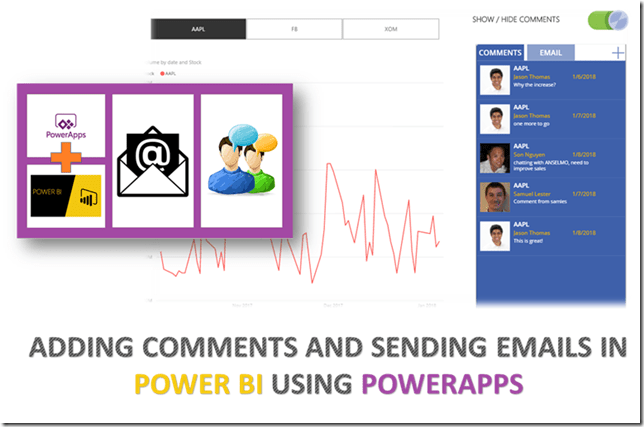
A couple of days ago, a new custom visual was released for Power BI – PowerApps (in preview mode). As mentioned in the team blog, there are a ton of use cases–
you will be able to pass context aware data to a PowerApps app which updates in real time as you make changes to your report. Now, your users can derive business insights and take actions from right within their Power BI reports and dashboards. No need to switch tabs to open the separate apps, copy paste data from one window to another or worry about fat fingering the wrong customer id or invoice amount.
If you think about it, this is a game changer – you finally have a BI tool that allows you to collaborate and take actions right within the report. How many times have you looked at a report, found out an insight and wished that you could send an email to the account manager, only to forget later? Well, now you don’t have to worry about that, as I am going to show you an example of how we can collaborate by adding comments within the report (not just comments, but context aware comments, based on what you are selecting) as well as show how to send emails (to the appropriate people based on your selection).
Note: This is a long post, as PowerApps might be new to many BI folks and I wanted to include as many images as possible. If you just want to see the end result, please scroll to the end.
Steps
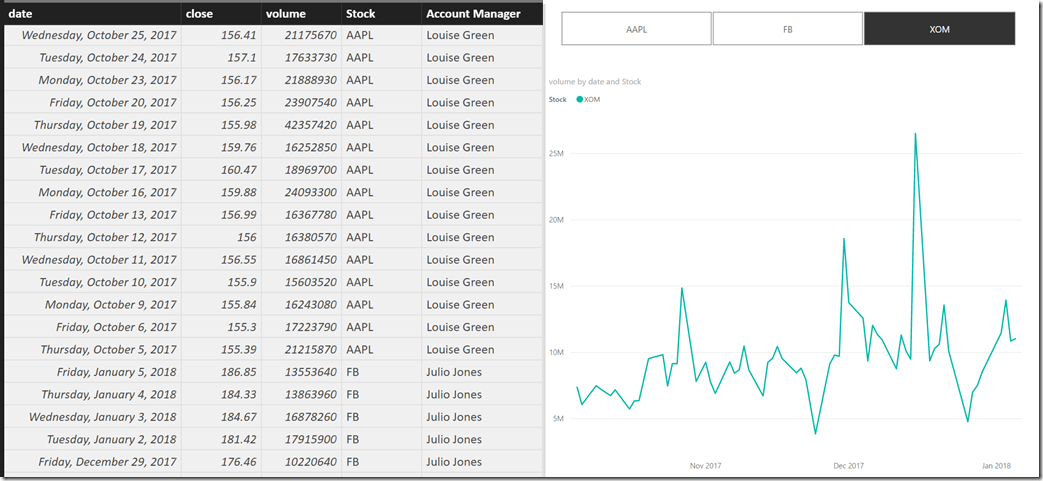
1) For this demo, I am using a simple Power BI report that shows the stock volume for three companies by date and their account managers. I made a simple line chart along with a slicer for the companies in Power BI Desktop, as shown below.
2) Deploy the report to Power BI service, and then edit the report. Add the PowerApps custom visual from the store.
3) Now click on the PowerApps custom visual, drag and drop the Account Manager and Stock into the PowerApps data field, and click on Create New.
4) The intention of the PowerApps visual is to provide an input area for the comment as well as to send emails to the account managers of the respective companies. For storing the comments, I am using a simple table in an Excel file and the format of the table is given below
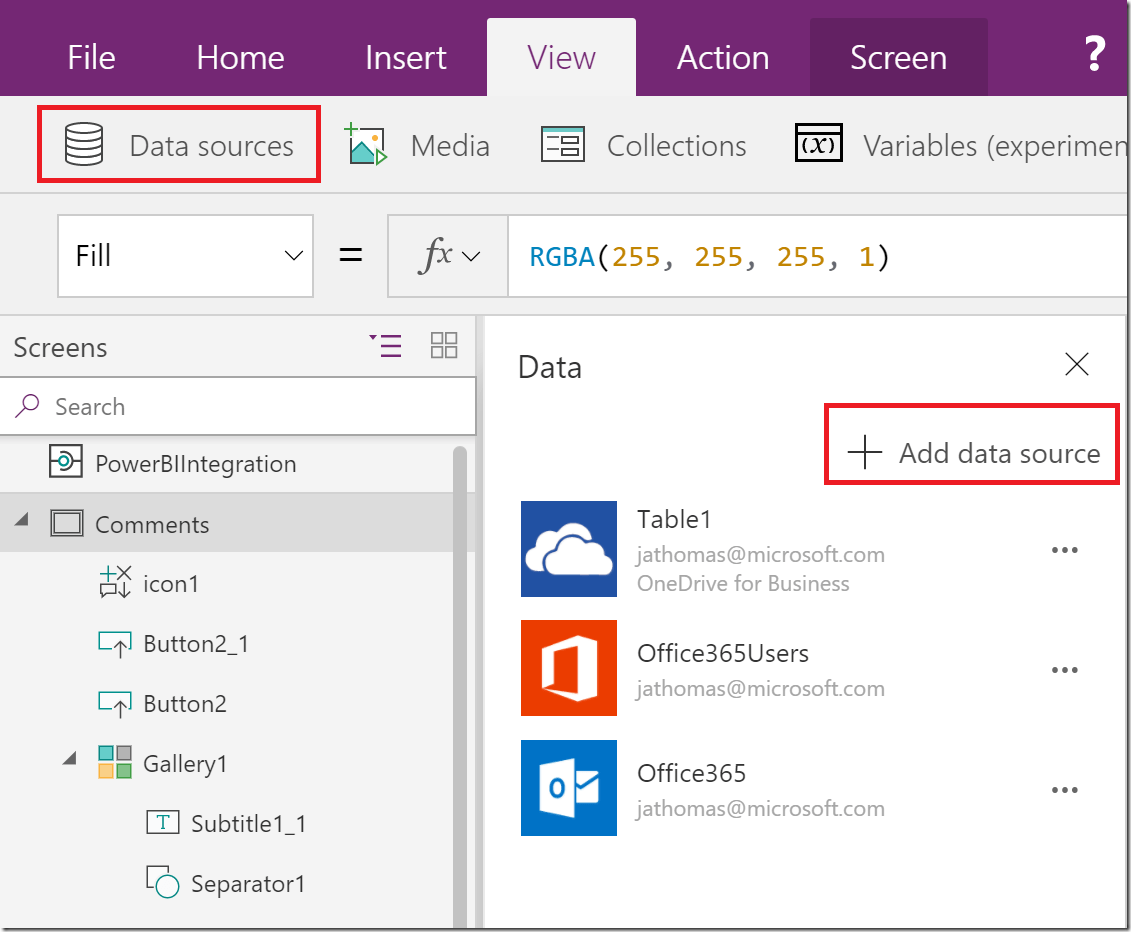
Note that we have a column for the stock, comments, date of entry and the user who entered the comment. Now, go ahead and create 3 new data sources - Office365 Outlook, Office365Users and the Table in the excel file.
5) At this point, I started editing the comments page (which is the first page) and the final result is given below.
Some of the key changes that I did are:-
-
Changed the Data field in the Gallery to filter for only those fields in the Table1 (comments table in excel) which are filtered in Power BI.
-
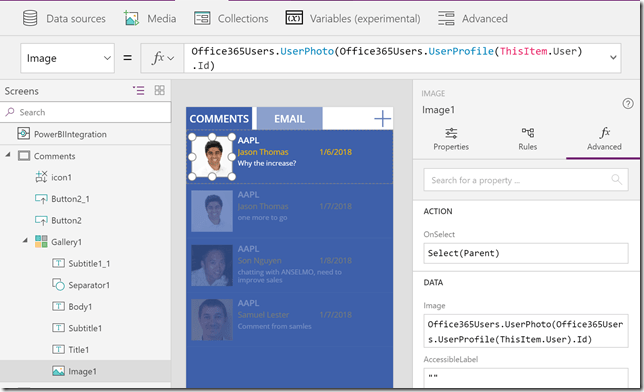
Changed the Gallery layout to display the Stock, User, Comments, Date from the Excel file as well as the photo of the user. You can get the photo of the user by using the formula given below
Office365Users.UserPhoto(Office365Users.UserProfile(ThisItem.User).Id)
-
Changed the background color of the Gallery to blue, and also added 3 buttons – Comments, Email and the plus icon. The Comments and Email button are given appropriate colors so that it looks like a tabbed structure. Also, their OnSelect properties are set to navigate to Email page and AddComments page on selecting.
-
Comments – No formula.
-
Email – OnSelect property is set to Navigate(Email, Fade)
-
Plus Icon – OnSelect property is set to Navigate(AddComment, Fade); ResetForm(EditForm1)
-
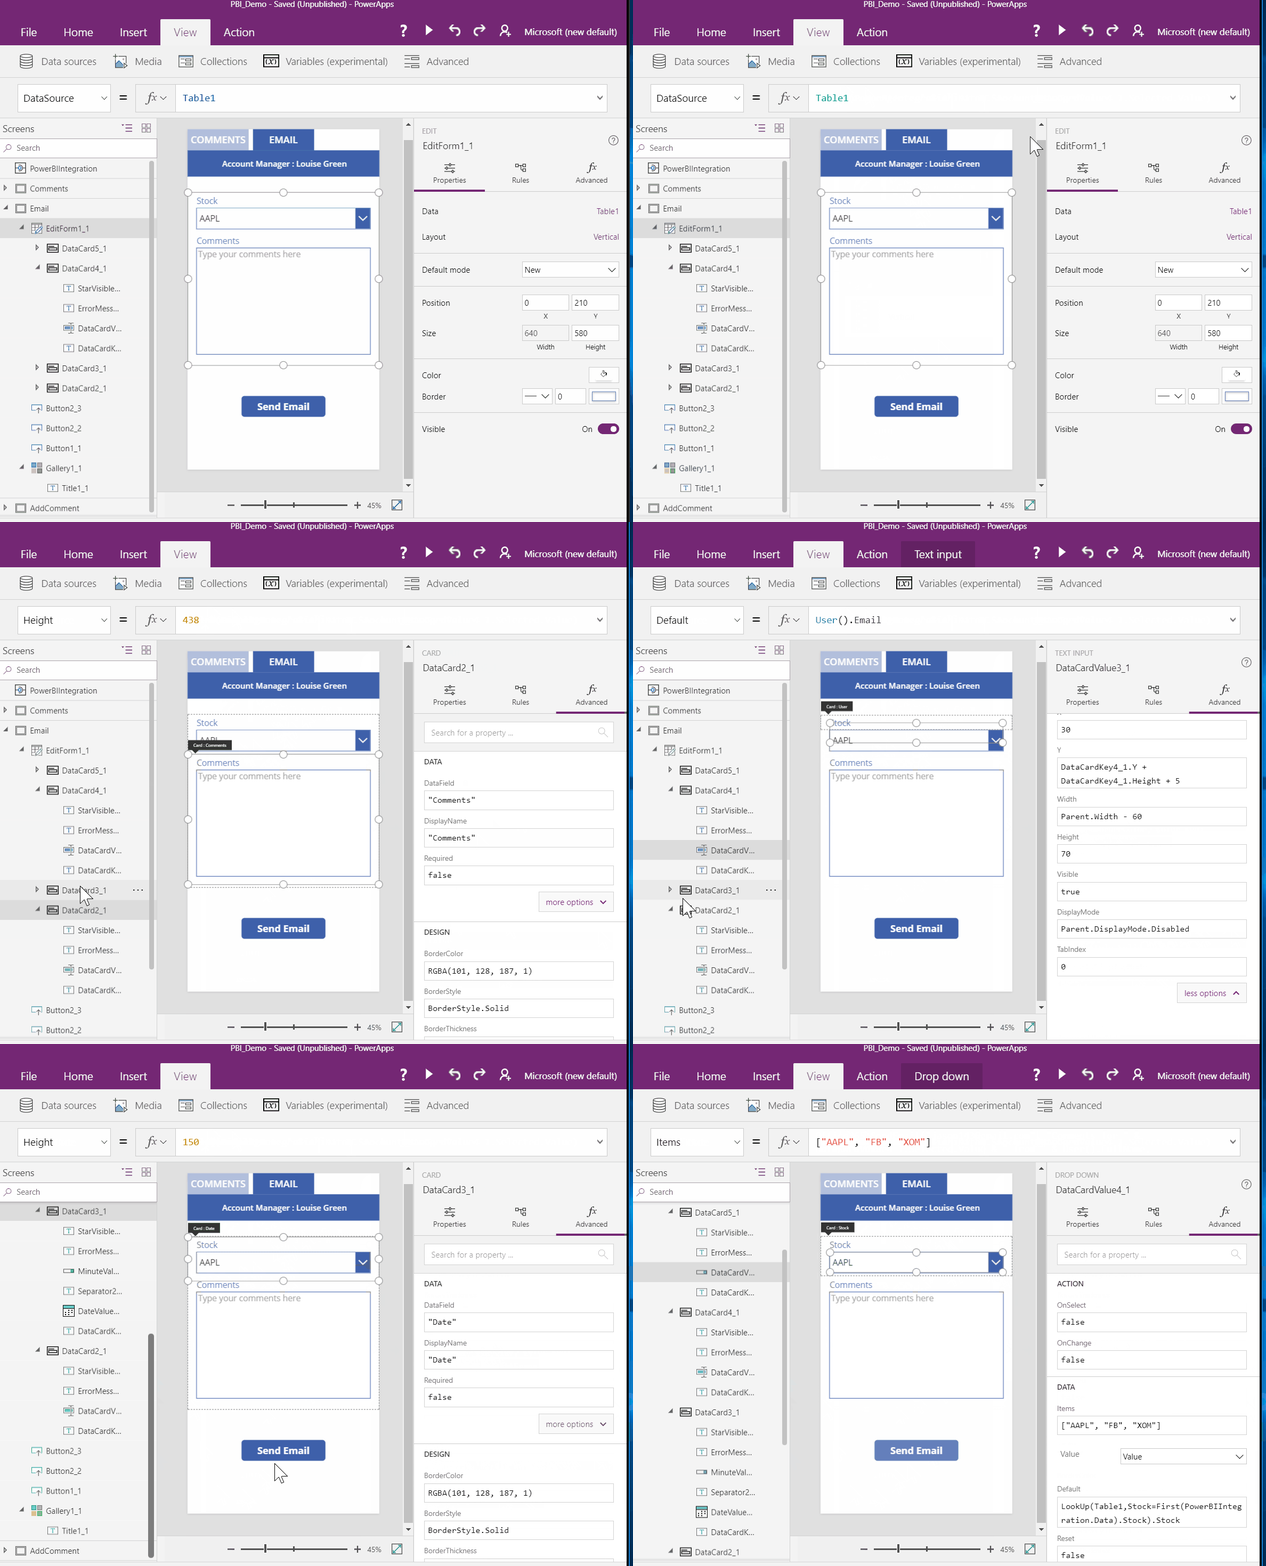
6) The next page is the Email page and is used when you want to send an email to the account manager without adding a comment. For eg, maybe you want to send a confidential email to the account manager about an insight or question.
Some of the key changes that I did are:-
-
Created a form for Table1 and displayed the stock & comments. Also added the User and Date fields, but hid them (by setting the DisplayMode property to Parent.DisplayMode.Disabled) after giving a default values
-
User – Default property set to User().Email
-
Date – Default property set to Today()
-
-
Created a button for Send Email, which will send the message as an email. Set the OnSelect property to the formula given below
Office365.SendEmail(“[email protected]”, “Comments for ” & DataCardValue4_1.Selected.Value & ” from ” & User().FullName, DataCardValue2_1.Text); ResetForm(EditForm1_1); Navigate(Comments, Fade)
-
Added the Default value of the Stock to the formula below, so that it will default to the value selected in Power BI
LookUp(Table1,Stock=First(PowerBIIntegration.Data).Stock).Stock
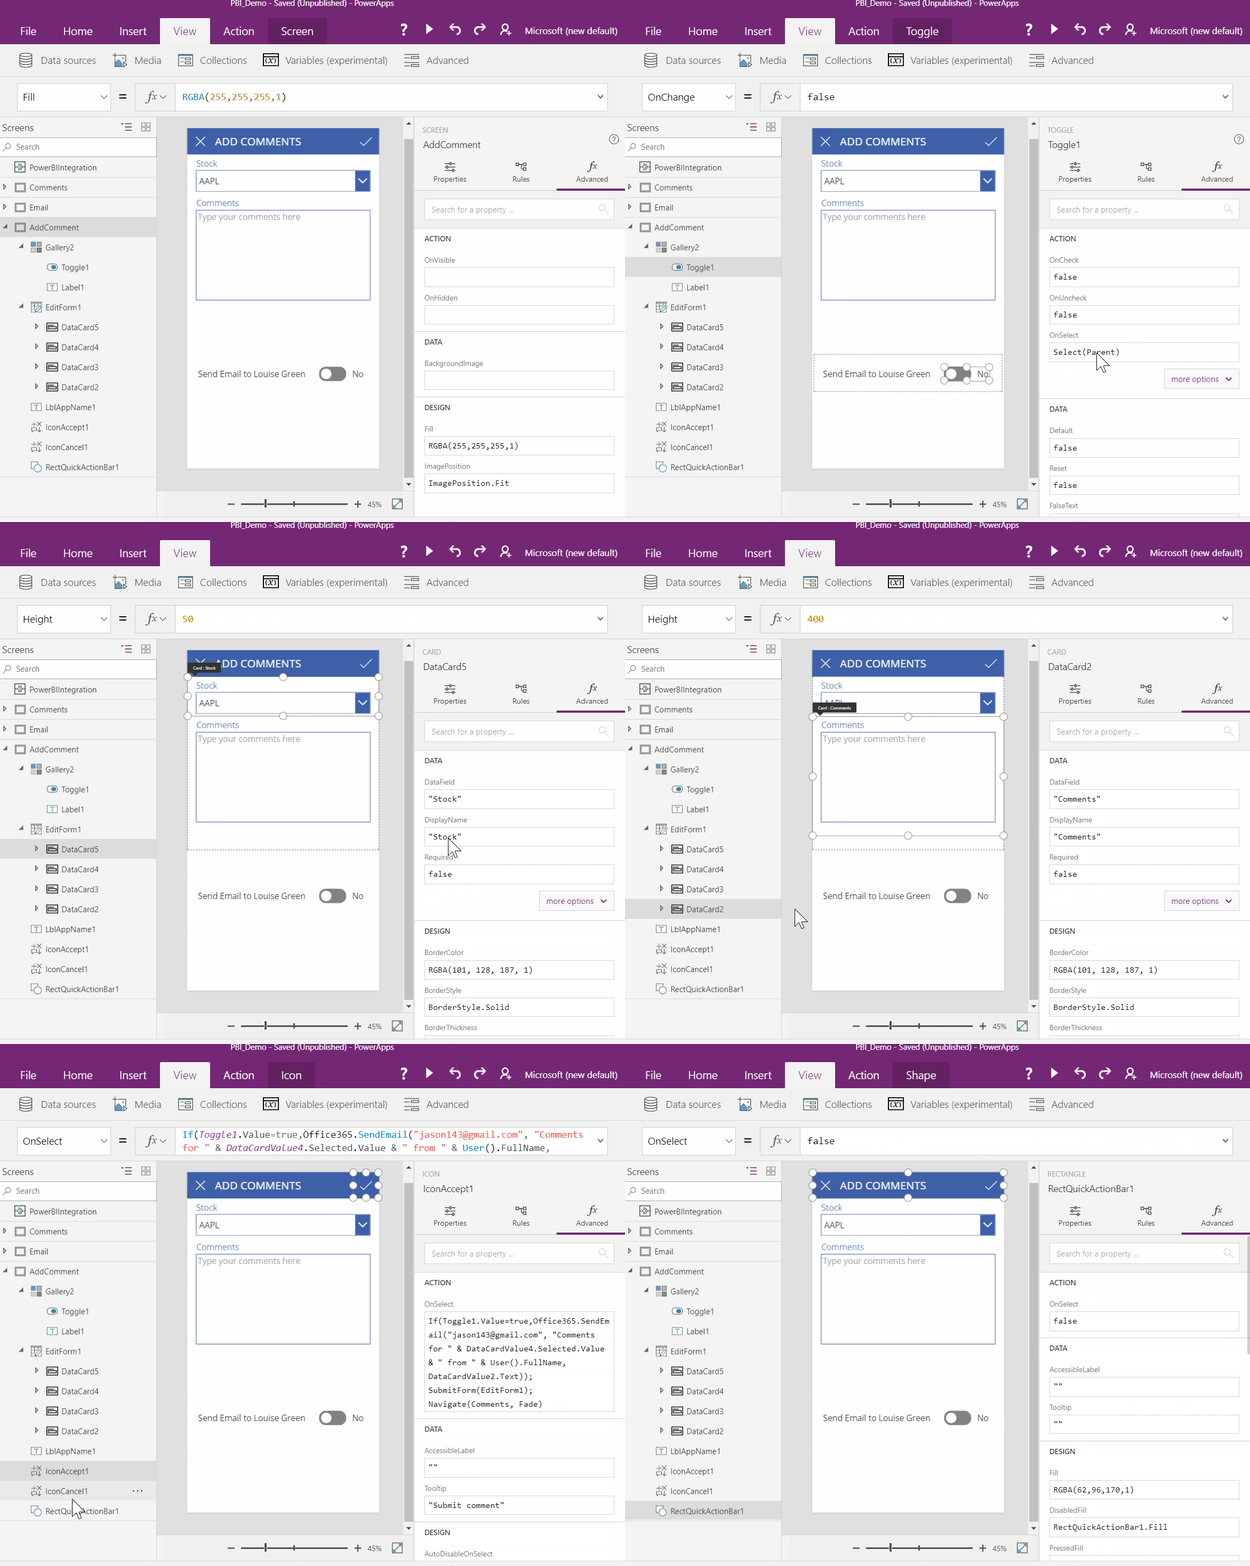
7) The next page is the AddComment page. This is the page that you navigate to when you clicked on the Plus Icon in the Comments page and is used for adding comments.
Some of the key changes that I did here are:-
-
Similar EditForm as the Email page – displaying only Stock and Comment and hiding User and Date
-
A toggle that determines whether you want to send an email along with adding the comment or just add the comment only.
-
2 icons on the top
-
one for canceling the form – OnSelect property set to Navigate(Comments, Fade); ResetForm(EditForm1)
-
one for submitting the form. OnSelect property is set to
-
If(Toggle1.Value=true,Office365.SendEmail(“[email protected]”, “Comments for ” & DataCardValue4.Selected.Value & ” from ” & User().FullName, DataCardValue2.Text)); SubmitForm(EditForm1); Navigate(Comments, Fade)
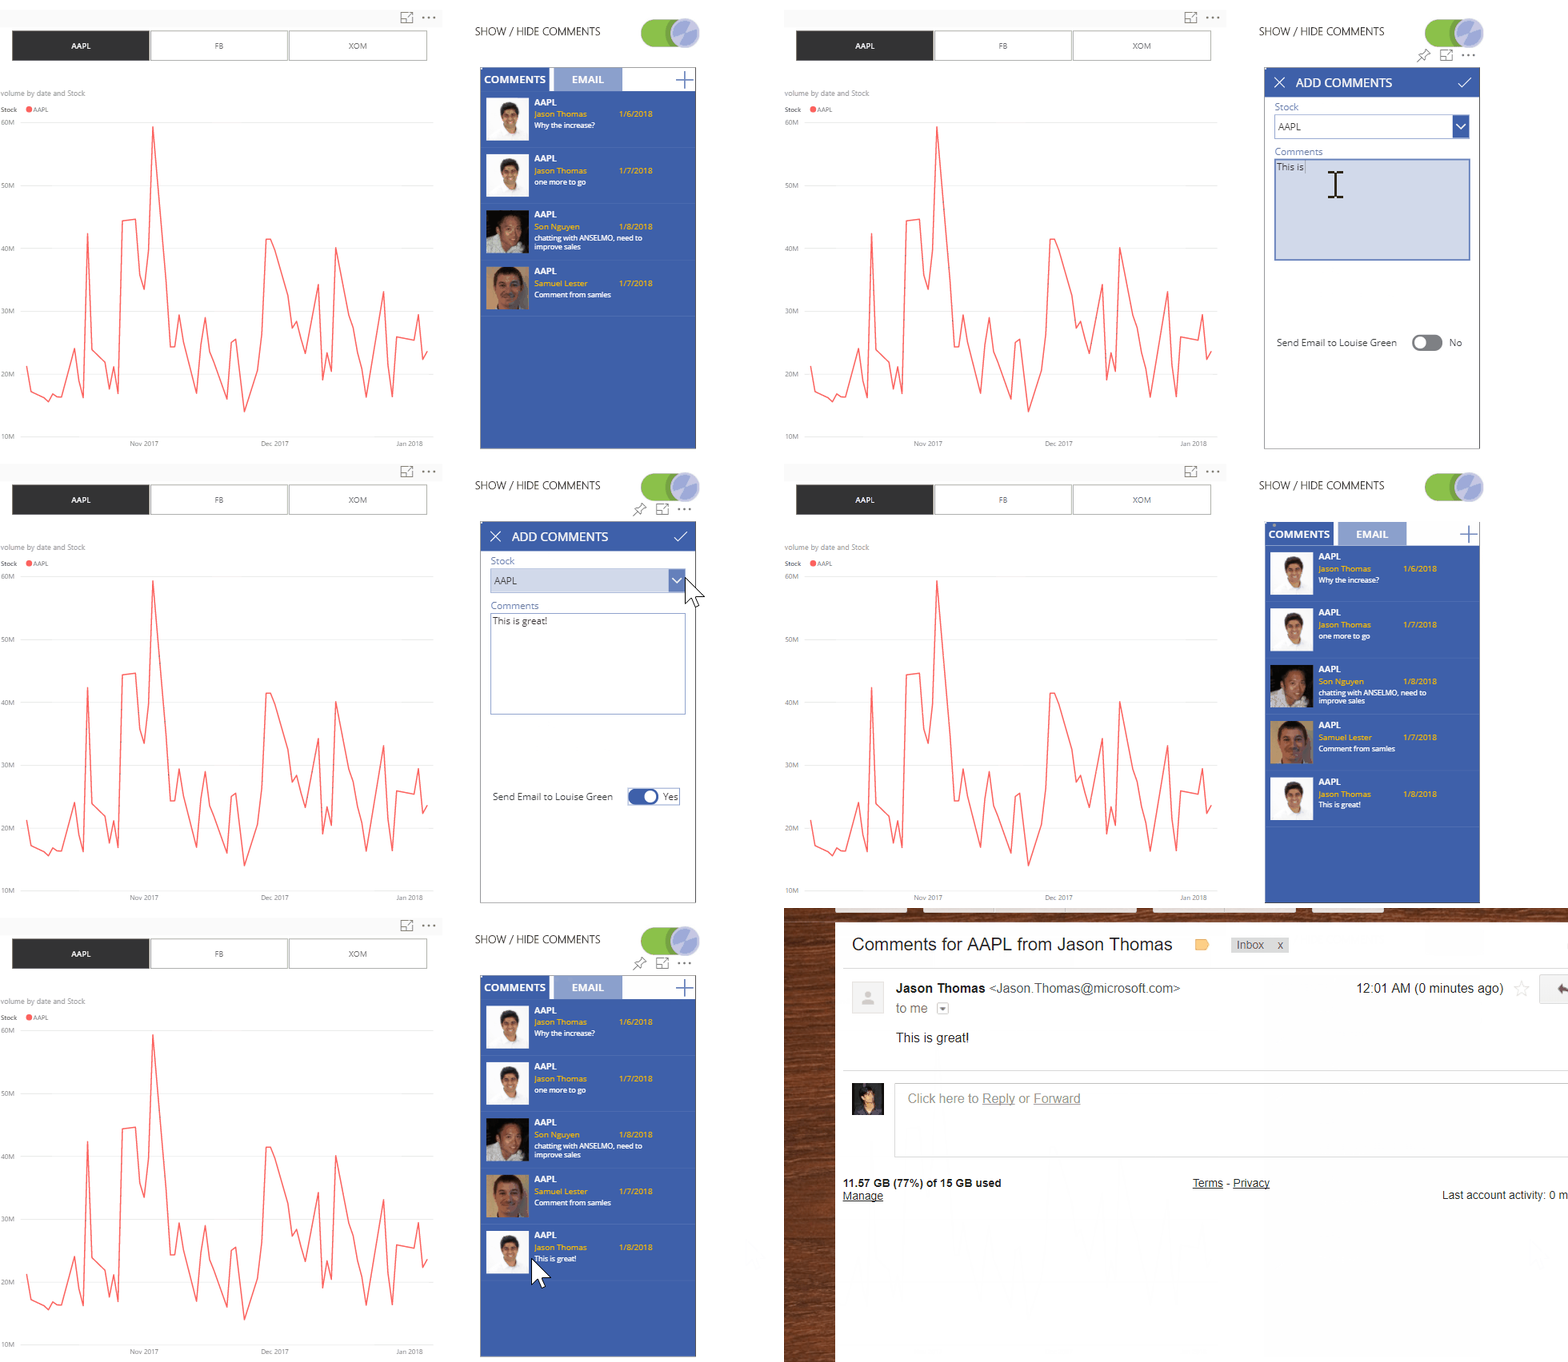
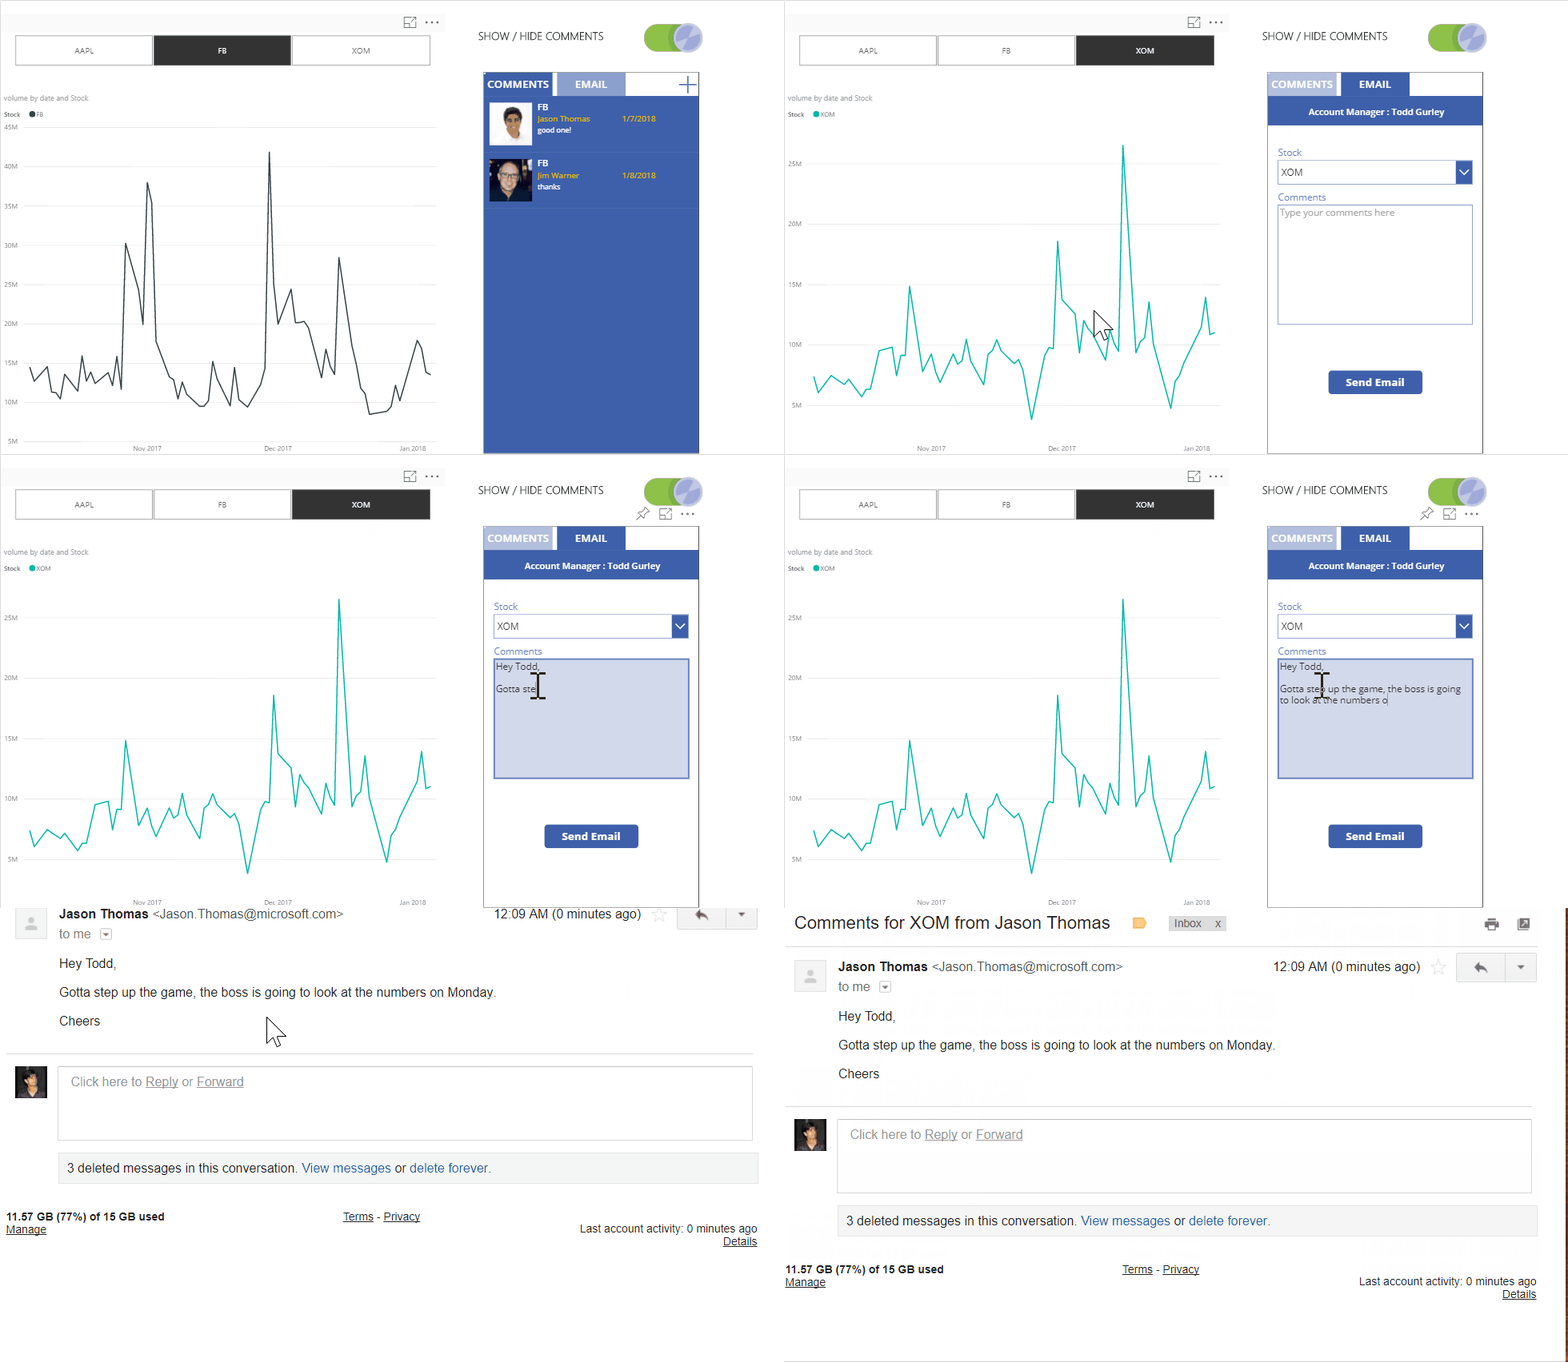
8) Now you can save and publish the app. See the results in the Power BI page. I also added a toggle using bookmarks in the Power BI page to show/hide the comments / PowerApp visual.
-
Show contextual comments
-
Add comments based on what you have selected in Power BI. Also note that an email has been sent to the appropriate account manager with the comment.
-
Send an email to the account manager directly (without posting the comments)
I am pretty sure you guys are going to find a lot more use for this custom visual. Note that this is currently in Preview, so it is likely that you will hit upon some bugs / issues, but those should be gone when it is released.







Fantastic post, Jason! I spent half the day yesterday trying to figure out how to add Power App that would enable me to collect feedback from my report readers, so I think this gets me another step along that process.
Great Example, where can i download this PBI file from, Thanks
Sohail
Not really sure how to share as you will not have access to the PowerApp that I made. Let me know if you have any questions when you follow the steps and I will try to help as much as I can.
[…] Adding Comments & Sending Emails in Power BI using PowerApps by SQLJason (http://sqljason.com/2018/01/adding-comments-sending-emails-in-power-bi-using-powerapps.html) […]
Great Piece of Work..! I am very new to power Apps…it will be good if you can share the complete step by step video for reference in future.
Many thanks
I’m Trying to do this without the sending of the Email. My second screen shows “no Items” where it should show the comment box.
For my Form1 what should i write for Item Property?
You might not see any value in PowerApps if it is linked to PowerBI. You have to publish it and view it within Power BI, as it is expecting the selection from Power BI. Try that and let me know if it works
How do you change the fields available to PowerBIIntegration once you’ve created the app ? Or do you need to start again if you chose to supply more or different fields to the PowerApp from PowerBI ?
I think you can just add the field in Power BI in edit mode, and then edit the PowerApp to get the field in. After saving, the new changes should be visible. That said, it is still in Preview mode, so you might face some wrinkles.
Worked it out. Delete PowerApp from Power BI Report. Re-add (not using Edge) PowerApp visual, re-open in studio and it updates the Integration object.
How did you get it to show the date in the comment screen?
Check out step 6, where I added the Date - “Date – Default property set to Today()”. This ensures that the date is recorded when the comment is entered. Now I can just use that field to display the date in the Gallery, just like the other fields
This looks fantastic!! Thanks for sharing this.
I have 3 Questions:
1. Would it be possible for the user to edit/delete their own comment?
2. Can this be done in a way to read from and write back to a SQL Server db instead of the Excel sheet?
3. How is the PowerApp share/published? Could anyone in my organization find this app in the AppSource and add comments to this?
1) Yes - https://docs.microsoft.com/en-us/powerapps/maker/canvas-apps/functions/function-remove-removeif
2) Yes - https://docs.microsoft.com/en-us/powerapps/maker/canvas-apps/connections/connection-azure-sqldatabase
3) In this example, I have embedded the PowerApp into Power BI. So anyone with access to that Power BI report and PowerApp can view it by just browsing to the Power BI url. You can also share PowerApps directly - https://docs.microsoft.com/en-us/powerapps/guided-learning/manage-apps#step-1
Hi,
So my PowerApp is shared with my organization, but when i tested the app with a colleague’s account on PowerBI, i couldn’t view or add any comments because the excel file wasn’t shared with that person. Is sharing the file with all report users the only way to go ahead with my Excel based POC of this commenting feature?
Yes, the person who is writing the comment should have write access to the source (whatever it is - Excel, database, etc.)
How did you get the “Stock” Information for the comments/email? Did you hard code the 3 stocks? My DB will have thousands of items.
got it! I now understand the importance of the gallery in the new comments page 🙂
I have created this app but my app is not working ,their is an error when i am running this app .when i have clicked on Email button it show’s error that “No items to display”.
and “Selected.value ” is also displaying in my app
This is a great Article. Thanks for sharing this.
I would like to capture the comments, when the combination is selected. For example, i have two slicers, one is “country” and other is “Period”.I Have a simple table visualization, with Country,Period, Sales. when i Clicked on a particular row in the Visualization table, my PowerApp should pick up the selection. currently i was able to filter for one dimension (Period) [Filter(Table1, Period in PowerBIIntegration.Data.Period)], However i need to pass entire row from power BI to Power APP to filter in the PowerAPP visual.
Is there any way to tweak this?
Thanks in advance
Is it possible to make a video of the steps. I am new to power apps and i tried following the above steps. but getting error.
Can i together with the comment show the stock value when the comment was posted?
Hello Jason,
Do you have a video/guide from A-Z how to create this app from the beginning ?
Power apps works for Power bi service level, but it is not working with Powerbi Report server.
When can power apps will be available in report server
HI
it seems to be really powerful way of doing it. I would like to apply the same principle to my case as follows:
1. Table 1 (from Oracle db) visible in Power BI where I have a list of cases (case no, case date, case title)
2. SHarepoint list where to add lesson learned. the list has case no, case title, lesson learned.
then I would like to use the powerapp custom visual into the powerBI report to feed the sharepoint list and add the comment. so my sharepoint list column case no and case title should be then populated from the table 1 available into the Powerbi report. the lesson learned will be filled in by users thourgh the powerapp custom visual.
could this work? if yes, how could I do it?
thanks for your advice and suggestion
Andrea
I am feeling motivated and now work harder to start my career in Power-BI, hope will get similar success. Thanks for sharing your Power-BI experience.
I am feeling motivated and now work harder to start the career in Power-BI, hope will get similar success. Thanks for sharing your Power-BI experience.
Could you share the powerApps(As a downloadable file). So that I can customize it to my data source
Great Work. It would be great to have the step by step video. Any chance for that?
Hey there - is it possible to have multiple filters applied to a gallery at once? So, say I’m filtering on a location and a time period that I’m being provided via Power BI? In the example above, it’s being done by one filter. Thanks!
Hi Jason!
Thank you very much for this very detailed tutorial! 🙂
I already implemented a commenting app into one of my power BI report and users started to use it. I use a sharepoint list to store the comments coming from Powerapps.
As users have to comment many lines (buyers commenting on Purchase orders) they asked if it is possible to select multiple lines in power BI table and upload the same comment for those selected via Powerapps?
thank you,
Tibor
5R5hAM Really informative blog article.Really thank you! Great.